Tutorial: Code Sharing Via Static Libraries And Cross-Project References
Finding an elegant way to reuse and share code (i.e., libraries) across separate iPhone applications can be a bit tricky, especially considering Apple’s restrictions on dynamic library linking and custom Frameworks.
Most people agree that the best way to re-use code is to use static libraries. This tutorial builds on that solution, showing how your Xcode project can reference a second Xcode project — one which is used to build a static library.
This approach allows you to automatically build that static library with the rest of your app, using your current build configuration (e.g., debug, release, etc.) and avoid pre-building several versions of the library separately (where each version was built for a specific environment/configuration).
Wanted: An Elegant Way To Share Code Across Projects
If you want to reuse/share code across different iPhone applications, you only have two options that I’m aware of:
- Copy all of the source code from the “shared” library into your own project
- Keep the shared library code in a separate Xcode project and use it to build static libraries (e.g., libSomeLibrary.a, also referred to as “archive files”) that can be referenced by your project and used via static linking.
The first option, copying the files, should be avoided when possible since it’s inherently redundant and contrary to the goal of keeping “common code” modular and atomic.
It’s a much better idea to put the code in a static library (see since, as mentioned in the introduction, dynamic linking to custom libraries/frameworks isn’t allowed by Apple when it comes to iPhone apps.
For instructions on creating a static library from your code see this tutorial on the Stormy Productions blog.
We’ve established that the second option is preferable, but there’s a catch: you’ll need to build and distribute multiple versions of the static library–one for each runtime environment and build configuration. For example, you would need to build both “release” and “debug” versions of the library for the Simulator, as well as other pairs for the iPhone or iPod device itself.
So, how can we avoid manually pre-building and managing separate .a files?
Solution: Static Libraries Built On-Demand Via Xcode Cross-Project References
The trick to avoid pre-building static libraries for each environment is to use an Xcode “cross-project reference” so that those libraries are built dynamically (i.e., when you build your own app) using your app’s current build configuration.
This approach allows you to both reuse shared source code and avoid the headache of managing multiple versions of the library. Here’s how it works at a high level:
- The shared code lives in its own Xcode project that, when built, results in one or more static libraries.
- You create an Xcode environment variable with a path to the directory that contains the static library’s *.xcodeproj file.
- All iPhone apps that need the static library will use the aforementioned environment variable to reference the library’s Xcode project, including any static library in that project and the related header files.
- Each time you build your project for a specific configuration/runtime environment, the shared project library will also be built for that config/environment–if it hasn’t already–and linked with your executable.
In addition to solving the main problem (reusing code and avoiding management of multiple library versions), there are a couple of nice benefits to this strategy:
First, if you make changes to the shared library source code, those changes will immediately be included the next time you build your own project (via the cross-project reference).
Second, you can modify the Xcode environment variable to point to different versions of any project. For example, you might have separate directories for “somelibrary-1.0” and “somelibrary-2.0”; as you’ll see in the detailed solution instructions, it’s easy to modify the environment variable and switch your project to a different version of “somelibrary.”
Implementing Cross-Project References
The instructions for setting up cross-project references to shared static libraries can be split into two parts:
- Part 1: Global Xcode Settings
- Part 2: Project-Specific Settings
I’ll be using an example in the instructions to help illustrate things. A suitable example would be an application that needs to use a shared static library from a separate project. In this case, I’ll use a sample iPhone app called “Game Skeleton” (by Matt Sephton) that depends on a static library called libcocos2d.a, which is part of the open source Cocos2d-iphone project.
Note: Cross-project referencing is a standard Xcode feature and is actually suggested by Apple in the official Xcode Project Management Guide documentation. You can get some great bits of info from Apple’s guide, but as you’d expect, it’s a high-level document.
Part 1: Global Xcode Settings
The first step in getting your Xcode project to use cross-project referencing is to configure a couple of things that aren’t specific to any one project (i.e., global settings).
Set up a shared build output directory that will be shared by all Xcode projects.
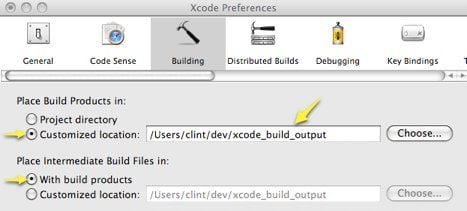
- With Xcode open, select “Xcode > Preferences” from the menubar.
- Select the “Building” tab.
- Set “Place Build Projects in” to “Customized location” and specify the path to the common build directory you created.
- Set “Place Intermediate Build Files in” to “With build products.”
Why is this necessary?
A brief explanation of why this is necessary might be helpful for some people. When you build your app (i.e., Xcode project) Xcode generates one or more “products” (object files, libraries, etc.) in the project’s own build output directory, by default; it will then “look” inside this directory when it comes time to link everything together and make an executable, for example.
Once you start using cross-project references, you’ll essentially be building more than one project. However, Xcode will still only look in the immediate project’s build output directory for libraries. Apple therefore recommends using a shared build output directory for cross-project references (see the last paragraph in the “Referencing Other Projects” section of “Xcode Project Management Guide: Files in Projects”). This ensures that Xcode will always be able to find products from other projects builds.
Will a shared build output directory cause problems?
I’ve had some questions from folks about whether or not using a shared build output directory causes problems. While I’m certainly not an authority on building with Xcode, I can say that in four months of using this technique (with several projects and a few different shared libraries) I’ve not had any problems (such as a “debug” build resulting in a “release” version of your library being overwritten, etc.).
Apple’s Xcode documentations clearly states that “Within the build directory, Xcode maintains separate subdirectories for each build configuration defined by the project” (see the “Build Locations“ section of “Xcode Project Management Guide: Building Products”). For example, I have a custom logging library that is used by multiple iPhone and OS X apps. The OS X versions of the *.a file show up in “Release” and “Debug” sub-directories within the common build output folder, the simulator versions in “Release-iphonesimulator” and “Debug-iphonesimulator”, and finally the device versions in “Release-iphoneos” and “Debug-iphoneos.” In other words, none of the builds seem to be overwriting each other.
Add a Source Tree” variable that Xcode can use to dynamically find the static library project.
“Source Tree settings” are basically Xcode environment variables that hold paths to directories on the file system; this allows us to make the cross-project references flexible and avoid hard-coded paths.
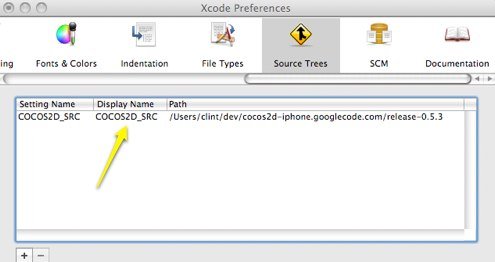
- Again, open the Xcode preferences.
- Select the “Source Trees” tab.
- Create a new Source Tree variable by clicking on the “+” button and filling in the columns. The screenshot above shows that we’re using “COCOS2D_SRC” for the cocos2d-iphone variable name and that it points to “/Users/clint/dev/cocos2d-iphone.googlecode.com/release-0.5.3”.Tip: avoid using special characters in the actual file path (i.e., stick to alphanumeric characters, underscores, and hyphens); this path will be used as a “Search Path” and Xcode seems to have problems with search paths that use characters like an ampersand (&).
Part 2: Project-Specific Settings
Once you’ve got Xcode configured to use a global build output directory and have a “Source Tree” variable pointing at your shared project, you’re ready to set up the cross-project reference, dependencies, etc.
Set Up the Cross-Project Reference, Header File Search Paths, and Static Library Linking
- Open your project in Xcode.
- In the “Groups & Files” pane of Xcode, select your project root and hit Option+Cmd+A (add to project).
- Find the Xcode project package for the project that contains the shared library. Using our example, we’ll select the Cocos2d-iphone Xcode project (cocos2d-port.xcodeproj):
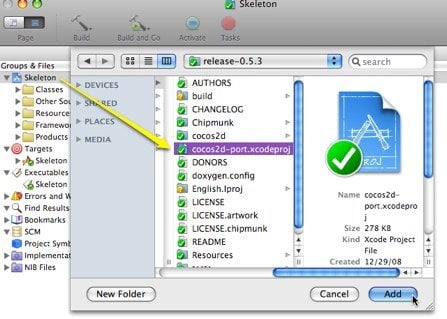
- When the “Add to Project” dialog is displayed, use the same settings displayed in the screenshot below and click the “Add” button. Important: do NOT check the “Copy items” box.
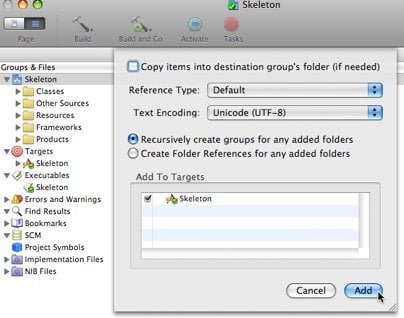
- After you click the “Add” button the project will appear as a “sub-project.” In our Cocos2d-iphone example, it looks like this:
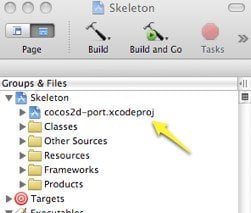
Remember that you have not imported a physical copy of the second project — it’s a reference.
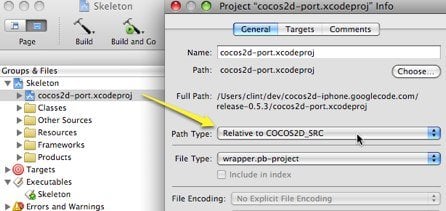
- When the cross-project reference appears select it and hit Cmd+i. Then change “Path Type” to be relative to the environment variable you set up in Part 1. In the example below, we’re using the COCOS2D_SRC variable:
Configure the Library Dependencies, Linking, and Header Files
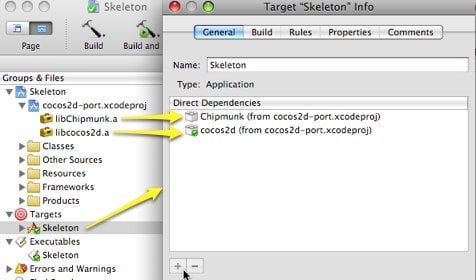
- In the “Groups & Files” pane of Xcode, under “Targets”, select your main app target and hit Cmd+i. Then select general tab and add the static library(ies) your app needs from the shared project by clicking the “+” button under “Direct Dependencies”. In our example, we’ve added the “Chipmunk” and “cocos2d” libraries which are both built from the Cocos2d-iphone project:
- Click on the build tab and scroll down to the “search paths” section
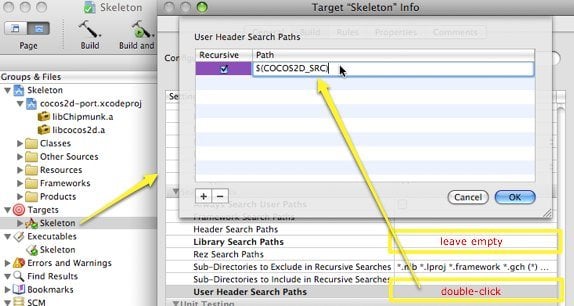
- Important: If a hard-coded path to your shared project appears in the “Library Search Paths” field, delete it. This can be done by double-clicking the field and using the “-” button.
- Double-click on blank area next to “User header search paths”. Then click on the “+” button, check the recursive checkbox, and type in the Xcode environment variable that points to your shared project directory, surrounded by $(). The example screenshot below shows $(COCOS2D_SRC) being used:
- When you click OK and go back to the general tab, the “user header search paths” text field should show an absolute path to your shared project directory. In our example, $(COCOS2D_SRC) expanded to the actual path and ends with “**” to show that the search will be recursive:

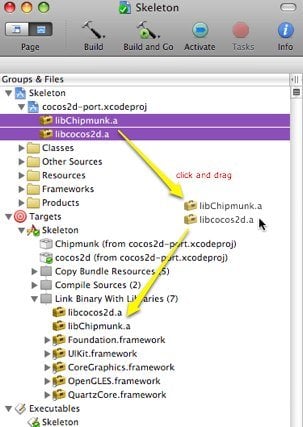
- Finally, click and drag the static libraries from underneath the cross-project reference to “Targets > {your target} > Link Binary with Libraries.” This ensures that that the .a files will be passed to the linker when you do the build. Here’s a sample screenshot from our example app:
Alternative Approaches:
zerg-xcode
Victor Costan has developed a slick command-line tool called “zerg-xcode” which helps you copy the source code from one Xcode project (i.e., a static library project) into another Xcode project. In addition to physically copying the files, it inserts the targets from the “library” project into your “app” project. If the library project changes, you simply run zerg-xcode again with the approriate commands to sync the files and targets. Some people may find this tool very useful; my personal preference, however, is to avoid making any copies of the source code files and stick to Xcode’s built-in “cross-project reference” mechanism.
“Fat” Universal Binary
Another approach is to “bundle” two versions of a static library into a single file, referred to as a “fat” universal binary (see this post on the Latenitesoft blog for an example). More specifically, one version of the library would be for the i386 architecture (i.e., the Simulator) and the second for the ARM architecture (i.e., the phone). This may be a perfectly fine solution for you if you really only need two versions, or if the source code for the library is kept private. That said, you’re still left with the task of maintaining pre-built versions of the libraries (plus the extra work of bundling them into the single file). In addition, I’m not sure that you can bundle more than two versions of the library into the binary (e.g., iPhone “release” and Simulator “release”, but not iPhone “debug” and Simulator “debug”).
Summary
I’ve been using this approach for about four months with several projects and it’s definitely saved me a lot of time.
If you have feedback, suggestions, or alternate solutions please leave a comment!


I’m working on a application that makes use of third party code. I wanted the code to be all self contained so that a new developer can simply grab the source code and compile without the need to modify their build setup.
The way I’ve settled on is to place third party code in a vendor directory. My project is stored in a Git repository and I use the braid Ruby Gem (https://wiki.github.com/evilchelu/braid) to manage those vendor trees inside my repository.
Depending on the third party project, I either include the source directly in my project, or I setup a dependent project links. Since the vendored projects are in my repository root, everything is self contained.
I find this combination to be quite useful. Braid makes it possible to check in SVN and Git vendor branches and later update those branches as they become available. If you’re using Git, I highly recommend that approach.
hi,
i would like to know how popular is useing shared code? and how many developers use it to produce their games ?
is it easy ?
regards
Aleksandra
It does not work on cocos2d version 09.