Developer-To-Developer iPhone App Distribution Without Ad-Hoc Provisioning

Developers can share iPhone applications that they’ve created with other iPhone developers without using ad hoc provisioning. Setting this up takes less than 5 minutes.
This is one of the method’s I’m considering for distributing CodePromo, my app that makes it easy to generate and share promo codes from the iPhone.
This article provides step-by-step instructions; it’s an expansion of the summary of the technique by Erica Sadun.
Overview
When you build and run on your development device Xcode first creates a device-compatible binary. and then signs it using your developer certificate. This latter step is what allows your device and its development provisioning profile to run the application. Apple provides tools that allow a binary’s signature to be replaced; if you’ve got a development certificate and a binary you can re-sign an app; it’s this re-signing that’s at the heart of this technique.
Preparing For Distribution
Step 1. Compile A Device-Compatible Binary
You create a device-compatible binary when you build to your device in Xcode. Open any iPhone project in Xcode and:

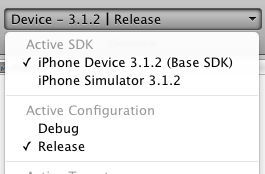
- In the Overview menu, choose iPhone Device for the Active SDK.
- While still in the Overview menu, choose Release for the Active Configuration. This will produce the smallest sized binary.
- Build the project using Build > Build from Xcode’s menu or by using the command-b keyboard shortcut.
Proceed to the next step after everything builds cleanly.
Step 2. Locate The Binary
Locate the compiled binary:

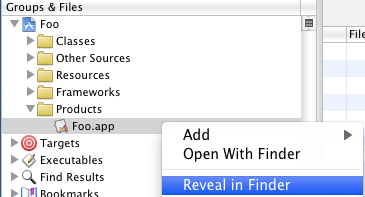
- Locate the Products folder under the project’s folder in the Groups & Files panel in Xcode. Expand it to show its contents.
- Locate the .app file for the app, right-click or command-click its icon, and click Reveal in Finder.
This’ll reveal the binary in the Finder.
Step 3. Create A Re-Signing Script
The binary you’ve created will only run on devices that have your development provisioning profile installed on them. For other developers to run your app they’ll have to re-sign the app using their provisioning profile. We’ll include a shell script to make it easier for them:
- Create a shell-script using the text editor of your choice.
- Paste the contents below into the editor.
- Replace the _APP_NAME_ in the shell script with the name of your app.
- Name it re-sign.sh and save it somewhere convenient.
#!/bin/bash
export CODESIGN_ALLOCATE=/Developer/Platforms/iPhoneOS.platform/Developer/usr/bin/codesign_allocate
codesign -f -s "iPhone Developer" _APP_NAME_.app
Step 3. Bundle Items For Distribution Folder
We’ll distribute a zip containing the binary and helper script from the previous steps:
- Open a new Finder window, navigate wherever you want the folder to reside and create a new folder. Use the app’s name as it will appear on the springboard as the name of the folder.
- Copy the app’s binary and the helper script from the previous steps into the new folder.
- Zip the folder.
And you’re ready to distribute the app.
The next section of this article shows the steps the recipient uses to install the app onto their developer provisioned iPhone.
Installing The App
It’s straightforward to install an application prepared as above:
Step 1. Extract and Re-Sign The App
- Extract the contents of the zip to a convenient location.
- Open a terminal window and navigate to the folder containing the zip’s contents.
- Type re-sign.sh from the command prompt to run the helper script to re-sign the binary. The script will output _APP_NAME.app: replaced existing signature if successful.
Step 2. Install The App
- Connect your phone to your computer and open Xcode.
- Use Xcode’s Window > Organizer, or the keyboard shortcut command-o, to open the Organizer.
- Select the phone from the DEVICES section in the left panel.
- Click the “+” beneath the Applications list/section of the Summary tab in the right panel, locate the .app file in from the zip, and click Open.
And that should do it. The app should now installed on the phone.
Screencast
I created a rough ~2 minute screencast demonstrating both sides of this process. View it here, or in higher-res at Vimeo.


I took what you did and automated it via a build script. It’s on github:
https://github.com/lottadot/iphonedevtodev